MARINE STITCH AND GLUE EPOXY BOAT BUILDING
STITCH AND GLUE -- GETTING STARTED/BASICS - CLICK for stitch and glue info
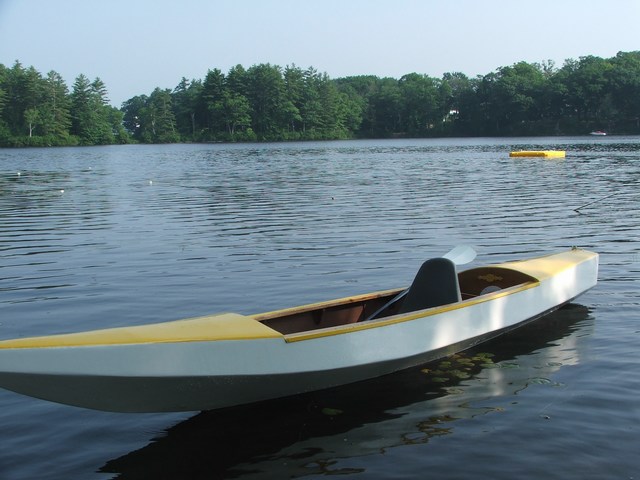
Building TOTO - Stitch and Glue Epoxy Kayak (Basic No Blush marine epoxy)
An online photo album documenting the STITCH AND GLUE construction of a small kayak using marine epoxy products
In the early fall of 2007 I got the urge to build another small boat using the 'stitch and glue' method which involves cutting out pieces of plywood from a set of plans and 'stitching' them together - very much like a sewing pattern. The seams are sealed with epoxy then painted and decorated. That's it!
As the owner and 'guy who answers the technical question' at Progressive Epoxy Polymers, Inc. (click here for
the online marine site), this was the third or fourth small boat I have built. I didn't keep track of the amount
of epoxy and other products I used, as I could just grab it off the shelf as I needed it and I could 'play' with
any of the products I wanted. I think our boatbuilding/boat owner customers like emailing questions and comments
(and pictures) with a vendor/supplier knows his products and used them exactly the way they want to use them. It
is more like a peer to peer thing, instead of buyer and seller thing.
Basically, building began with 2 sheets of 1/4 inch plywood from Home Depot. The pattern was transferred to the
plywood and the wood was cut. Electrical cable ties held the pieces together and the joints were sealed using our
Basic No Blush Marine epoxy and 3 and 4 inch fiberglass cloth tape (just depending was I had available at the time).
Then lots of sanding and fairing using putty and epoxy. Then more sanding and priming. Using flexible wood strips
I created curved fore and aft decks, covered the deck frames with duct tape (to form a skin) then covered the duct
tape with epoxy and fiberglass cloth. Them lots more sanding and fairing of the decks to get them 'perfect.' Finally
some paint....
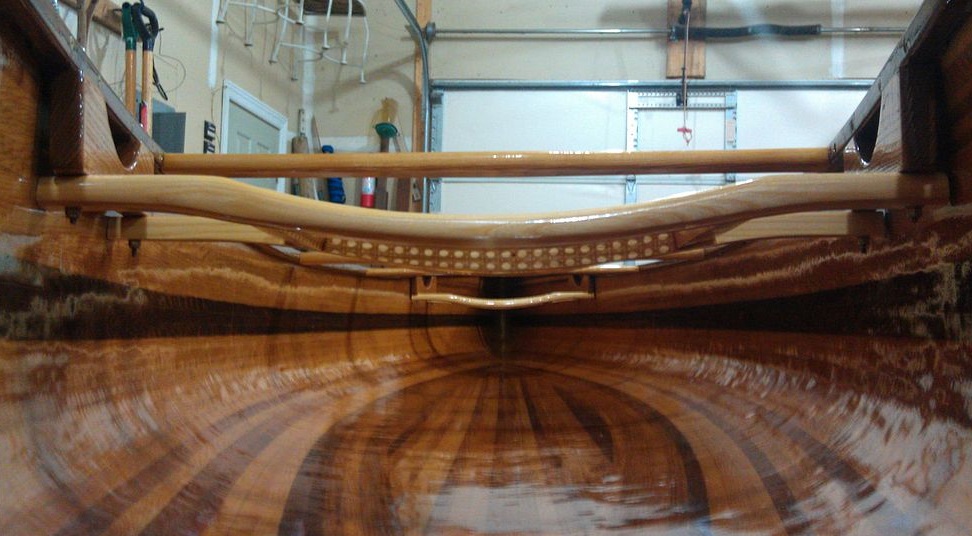
I did spend a good bit of time (and money) trying different ideas on how to make the curved fore and aft decks,
the 'mini 2-3 inch wide side decks, and the rubrail edge along the side of the boat. The plans get you the basic
hull, but most of the other 'stuff' is up to you! I added fancy decorative 'carvings' from Home Depot, access ports
into the sealed fore and aft hull chambers, and I extended the side panels a little bit to give the transom a bit
more classic look. I also used an epoxy - graphite mixture for the boat bottom, mostly because some of my boatbuilding
customers have done that and I wanted to 'try it out'. I don't think it adds anything to the project, but I learned
a few things doing it so it was worth the time, effort and money.
Actually there were lots of mistakes, goof ups, experiments that didn't work but took lots of time, do-overs, etc.
that are all part of the process, (even with a few boats under my belt) that I don't wish to recount. I will say
I planned on having lots of natural varnished wood showing, but the quality of my workmanship was not good enough
so I had to use paint to hide the many patches, putty and epoxy fixes the are abundant on the boat. I worked only
a few minutes each day and not every day, so the construction went on for months (about November to July).
The plans for TOTO are available from DUCKWORKS ($17.50 when I purchased them in 2007). The site also has some pictures
of various TOTO kayaks built by folks like you and me. The designer of the boat is Jim Michalak who has his own
web site - www.jimsboats.com.
I purchased some photo album software that allows me to create and post a photo album on-line. I took pictures
during the construction and the album contains about a dozen shots.... CLICK HERE TO VIEW.
|
The Marine Epoxy Everything Guide Everything from user reviews, repair examples, pricing issues and vendor evaluation tips
Basic No Blush Marine Epoxy Product Page Basic No Blush 12 oz Marine Epoxy sampler Marine Epoxy Catalog page (multiple epoxies) Basic No Blush Marine Epoxy User Reviews / Feedback How To Evaluating Marine Epoxy brands and Vendors Marine Epoxy prices - what it really costs! Marine Epoxy amine blush - what is epoxy Blush? Boat repair examples using Marine Epoxy Dinghy Marine Epoxy boat repair case study Progressive Epoxy Polymer's marine web site Massive site of Internet boat links
|
Building the stitch and glue, plywood, "Portuquese Style Dinghy" (winter 2008/2009) - CLICK HERE
PAUL OMAN
co-owner Progressive Epoxy Polymers, Inc.
marine epoxy home page (and the place you may have come from to get here!)
Marine epoxy and Floor Epoxy into - CLICK
Serious Links into the Epoxy World - CLICK -
Leap Into the Marine Epoxy - Boat Resin Environment - CLICK marine epoxy homepage -
Building a Plywood Kayak with marine epoxy - CLICK - (this page)
STITCH AND GLUE -- GETTING STARTED/BASICS - CLICK (stitch and glue boat construction)
Cedar strip canoe using Marine Epoxy and India Spar Varnish
|
ONLINE PRODUCT CATALOGS PROGRESSIVE EPOXY POLYMERS, Inc
|
|||
|
ONLINE STORE Purchase Here ------ or CALL 603 435 7199 ------ HOME PAGE |
|||
|
Marine Catalog |
|||
*
home page
of marine catalog section (blue background)
|
|||
| Section One
MARINE - CLEAR EPOXIES Section Two FILLERS THICKENERS ADDITIVES Section Three THICKENED EPOXIES - EPOXY PUTTIES, ETC. Section Four EPOXY PAINTS (barrier coats) Section Five URETHANES AND NON-EPOXY COATINGS Section Six NON-SKID DECK COATINGS Section Seven MARINE REPAIR PRODUCTS Section Eight MISC. MARINE PRODUCTS |
|||
|
MASSIVE BOAT HOW TO - ISSUES - HELP WEB LINK SITE |
|||
|
Residential / Commercial / DIY Catalog |
|||
*
home page
of residential/commercial catalog section (brown background)
|
|||
|
Section A
EPOXY PAINTS Section B FLOOR EPOXIES (regular and non-skid products), SEALERS, ACCESSORIES Section C THICKENED EPOXIES - EPOXY PUTTIES, ETC. Section D CLEAR EPOXIES Section E NON-EPOXY PAINTS COATINGS SEALERS Section F MIX-IN ADDITIVES Section G OTHER PRODUCTS Section H SURFACE PREPARATION PRODUCTS Section I MISC. ACCESSORIES |
|||
|
WEB EPOXY FLOOR ISSUES LINKS SITE --- WEB EPOXY REPAIR LINKS SITE |
|||
|
top selling favorite products for your every need Buy Talk Chat Support EMAIL or 603 435 7199
American manufactured, distributed, and sold epoxies and coatings. Your business helps small American Family Businesses - Thank You! |
need to learn more about epoxies??
--- visit these third party sites ---
(EVERYTHING-EPOXY.INFO --- Intro to basic epoxy resin types)
also visit the EPOXY GURU
Building TOTO - Stitch and Glue Epoxy Kayak (Basic No Blush marine epoxy)
An online photo album documenting the STITCH AND GLUE construction of a small kayak using marine epoxy products